null
Tattu, the official battery for the Sharjah Drone Racing Champions Event, in partnership with MultiGP Drone Racing, in Sharjah UAE.

Building your own drones

Nov 21st 2016

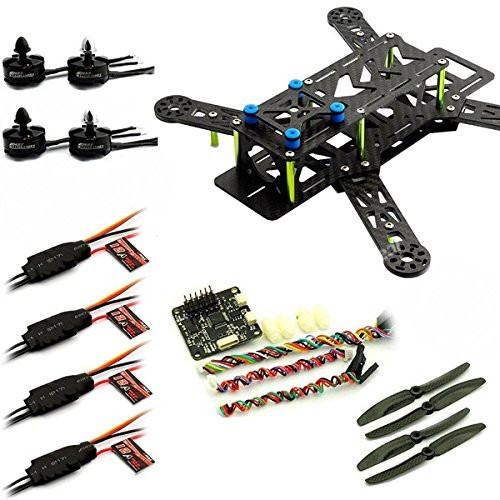
As it is generally known, a drone is a helicopter and several rotors are responsible for lifting and propelling it. If you are a lover of this magical artifact and have a great desire for creating your personal drone from scratch this guide is just for you because here we will cover all major concepts. Introduct building your own drones just in a few simple steps, After mastering some simple techniques, you will be able to Building your own drones.

building your own drones

Building your own drones what do you need?

First, you need to buy a package which will contain all necessary parts of it. In this guide we will show everything in the example of Nighthawk 250 package.

#1 Nighthawk 250 package

Nighthawk 250 - Building your own drones packageIn the content of this package you will get 4 12 am PC, CC 3D flight controller, 60 30 fiber props, four 2204 2300 kW motors and the last, but also the most important one is a full carbon fiber frame, with a bag of hardware. Here are all the screws, dampeners for the camera mounting and the carbon fiber body parts. In the package you can also find all necessary instructions. After getting all necessary parts from your package you should screw the arms to the actual body frame. Constructing or diy drone you need to start off screws from the top, put arms on which goes over the buttom part of the frame you add all locking screws. You should connect all arms to the body using screws, and bullet connectors to the motor cutting down some of the power wires. Then, shorten all unnecessary power wires and make ready to be mounted on the power distribution board. Building your own drones, The next step is connecting the header pins to the knee board. In this case when mounting the arrows are pointed to the right, you will have access to your USB. After this connect the battery cable to power distribution board so you will have to find positive and negative connection pads. That means negative should be connected to negative and positive should be connected to positive as well. Mount the motors on the drone. In your EMAX kit there are clockwise and counterclockwise proper motors which you also should connect to the arms of your frame. In this part we shall connect all signal wires into the knees, and a receiver. Building your own drones You need not only to have EMAX kit, but also some other parts to make your drone fly.

#2 Transmitter

Transmitter Terranis x9dThe first one is a transmitter. It is a good idea to have a transmitter with at least six channels, you can also have one with four channels but in that case you cannot set up flight modes, discovery buzzer or anything else. Terranis x9d is a good and a little bit expensive one. However, it is very powerful, so you can do almost everything with it. For example, simply program it to speak to you.

building your own drones

#3 Receiver

Next, Building your own drones you need a receiver for your transmitter. You should use Sky d4 , because it supports telemetry and CPM telling you the RSS (radio strength signal indicator). It shows how strong your signal is. With this you can be warned when your signal is low. To connect your transmitter properly all four wires should be connected to the transmitter.

building your own drones

#4 Lipo battery

Another necessary tool is a battery with Tattu, because it is powerful enough to make your flight possible.

Tattu FPV battery

#5 Others (Camera, Antenna, flight controller, etc.)

For FPV part you should use camera for video transmitter. Immersion RS 5.8 is a great choice, because it normally provides the cleanest signals. To use transmitter and get the signals you also need an antenna. For a monitor part, you should use Dominator v2, which gives a clean picture. You can also put a memory cart there recording exactly what you see through to the monitor. In EMAX package you can also find CC3D flight controller.

Step by Step - Building your own drones

In this part of your job to Building your own drones, you need to set up your transmitter to work with drone properly.

#1 Set up

Building your own drones Set up a new model for your new drone. Go to menu, scroll down enter button and here create models. Also disable a switch warning, select model, hit page down. It is important to name your model. After this bound your receiver to remote. For this go down page two on your transmitter, change the mode from d16 to d8. To buy your receiver to your transmitter hold button on d4 and power up drone at the same time.

building your own drones

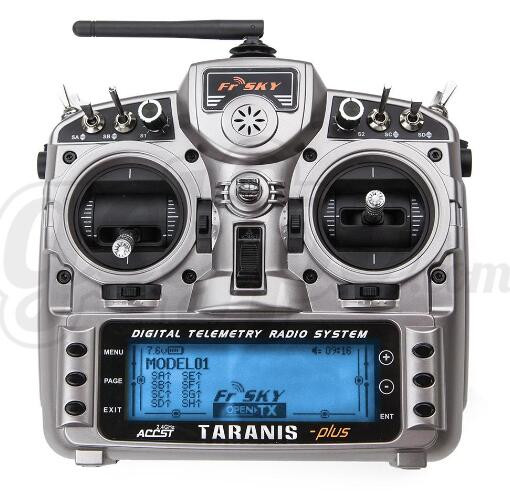
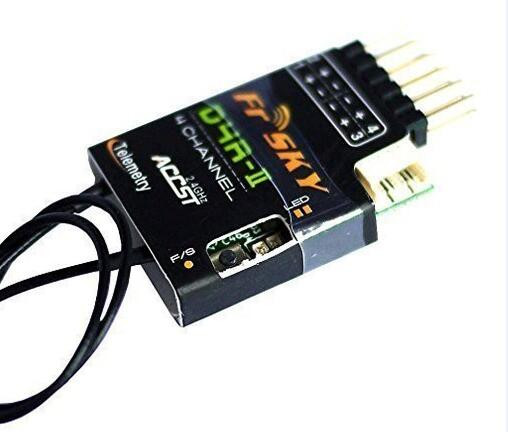
For making it easy just unplug the wire first and when you plug it back make sure you have the signal on the right power, in the middle and the ground on the left. When your transmitter turns on select bind and it will start beeping telling you it is in a bind mode. Then power up your drone holding the d4 button at the same time, plug in your power to flash, hit enter and exit out. 
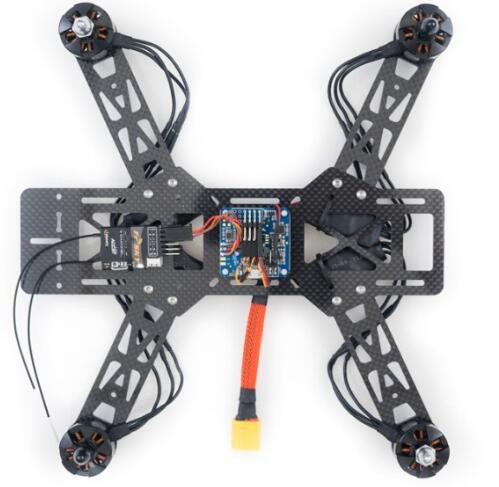
After this it is time to connect the base fly. For this you need to download all necessary drivers enable the base file to communicate with the whole structure. After installing the drivers go to your computer and launch them, which are automatically set auto connect. 
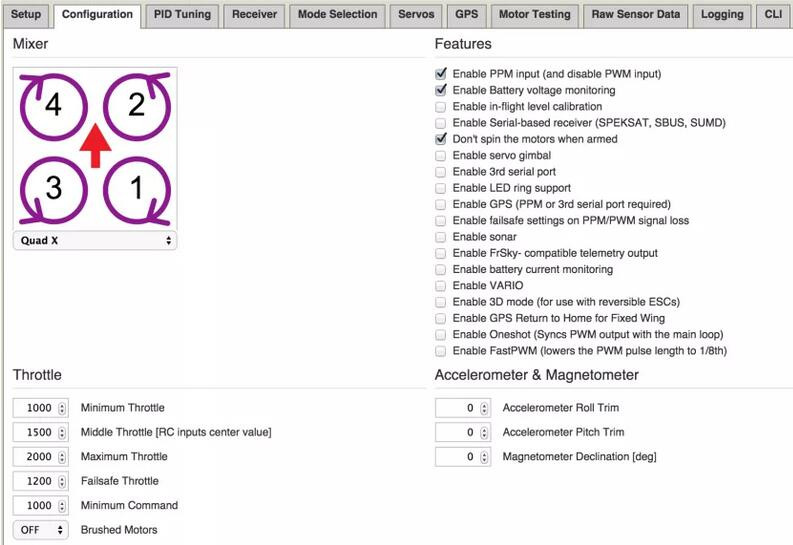
Make the pointing direction of your drone matching the one in the configuration file. You should see that after this everything will be tilting in the same way.

#2 Building your own drones The next thing you should do is calibrate the accelerometer.

calibrate the accelerometerTo do that you leave your drone completely flat on the table and you go to configurator enabling some features such as TPM, leave the battery voltage monitoring, do not spin the motors. By default the voltage of the battery will be 3.3, but because you should use 3-cell, put the voltage to 10.4 volts.

building your own drones

#3 Next, set up the receiver.

To do that you have to plug in your power to your drone and make some changes to make it work in a correct way. After this test the motors. In your configuration file, there is a diagram which shows the direction that the baby part of the frame should be spinning toward. The first and fourth spin clockwise, the second and third spin counterclockwise. Going back to motor testing part you can manually test the motors individually turning on and off the voters.

#4 After this, set up the flight modes on your transmitter.

First, program the switches to a channel four of which are reserved. You begin from the fifth and sixth channels, which are auxiliary and here you should set up flight modes. After programming your switches, plug your battery, so your receiver will work. Then set the auxiliary first of your transmitter to horizon and the auxiliary second to forward.

Conclusion

Why take Nighthawk 250, Because FPV 250mm is more and more popular at the moment. As you see, after completing above-mentioned all steps you can and make it working. Article from rcdronegood.com