
[DIY] Build Your Own FPV 250 Drones
Sep 20th 2018
As it is generally known, a drone is a helicopter and several rotors are responsible for lifting and propelling it. If you are a lover of this magical artifact and have a great desire for creating your personal drone from scratch this guide is just for you because here we will cover all major concepts. Introduce building your own drones FPV just in a few simple steps, After mastering some simple techniques, you will be able to build your own FPV drone.
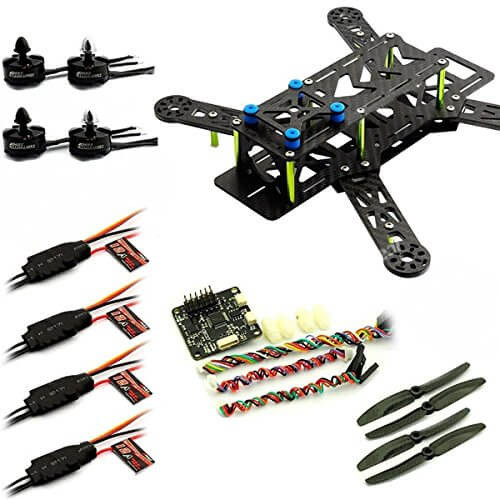 In the content of this package you will get 4 * 12 am ESC, CC3D flight controller, 6030 fiber props, four 2204 2300 kW motors and the last, but also the most important one is a full carbon fiber frame, with a bag of hardware. Here are all the screws, dampeners for the camera mounting and the carbon fiber body parts. In the package, you can also find all the necessary instructions.
After getting all necessary parts from your package you should screw the arms to the actual body frame.
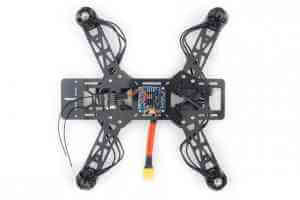
Constructing or DIY drone you need to start off screws from the top, put arms on which goes over the bottom part of the frame you add all locking screws. You should connect all arms to the body using screws, and bullet connectors to the motor cutting down some of the power wires. Then, shorten all unnecessary power wires and make ready to be mounted on the power distribution board.
After this connect the battery cable to power distribution board so you will have to find positive and negative connection pads. That means negative should be connected to negative and positive should be connected to positive as well.
Mount the motors on the drone. In your EMAX kit, there are clockwise and counterclockwise proper motors which you also should connect to the arms of your frame. In this part, we shall connect all signal wires into the knees, and a receiver.
In the content of this package you will get 4 * 12 am ESC, CC3D flight controller, 6030 fiber props, four 2204 2300 kW motors and the last, but also the most important one is a full carbon fiber frame, with a bag of hardware. Here are all the screws, dampeners for the camera mounting and the carbon fiber body parts. In the package, you can also find all the necessary instructions.
After getting all necessary parts from your package you should screw the arms to the actual body frame.
Constructing or DIY drone you need to start off screws from the top, put arms on which goes over the bottom part of the frame you add all locking screws. You should connect all arms to the body using screws, and bullet connectors to the motor cutting down some of the power wires. Then, shorten all unnecessary power wires and make ready to be mounted on the power distribution board.
After this connect the battery cable to power distribution board so you will have to find positive and negative connection pads. That means negative should be connected to negative and positive should be connected to positive as well.
Mount the motors on the drone. In your EMAX kit, there are clockwise and counterclockwise proper motors which you also should connect to the arms of your frame. In this part, we shall connect all signal wires into the knees, and a receiver.
 The first one is a transmitter. It is a good idea to have a transmitter with at least six channels, you can also have one with four channels but in that case, you cannot set up flight modes, discovery buzzer or anything else.
Terranis x9d is a good and a little bit expensive one. However, it is very powerful, so you can do almost everything with it. For example, simply program it to speak to you.
The first one is a transmitter. It is a good idea to have a transmitter with at least six channels, you can also have one with four channels but in that case, you cannot set up flight modes, discovery buzzer or anything else.
Terranis x9d is a good and a little bit expensive one. However, it is very powerful, so you can do almost everything with it. For example, simply program it to speak to you.
 Next, Building your own drones you need a receiver for your transmitter. You should use Sky d4 because it supports telemetry and CPM telling you the RSS (radio strength signal indicator). It shows how strong your signal is. With this you can be warned when your signal is low. To connect your transmitter properly all four wires should be connected to the transmitter.
 Set up a new model for your new drone. Go to menu, scroll down enter button and here create models. Also disable a switch warning, select model, hit page down. It is important to name your model.
After this bound your receiver to the remote. For this go down page two on your transmitter, change the mode from d16 to d8. To buy your receiver to your transmitter hold button on d4 and power up drone at the same time.
For making it easy just unplug the wire first and when you plug it back make sure you have the signal on the right power, in the middle and the ground on the left. When your transmitter turns on select bind and it will start beeping telling you it is in a bind mode.
Then power up your drone holding the d4 button at the same time, plug in your power to flash, hit enter and exit out.
After this it is time to connect the base fly. For this you need to download all necessary drivers enable the base file to communicate with the whole structure. After installing the drivers go to your computer and launch them, which are automatically set auto connect.
Make the pointing direction of your drone matching the one in the configuration file. You should see that after this everything will be tilting in the same way.
Set up a new model for your new drone. Go to menu, scroll down enter button and here create models. Also disable a switch warning, select model, hit page down. It is important to name your model.
After this bound your receiver to the remote. For this go down page two on your transmitter, change the mode from d16 to d8. To buy your receiver to your transmitter hold button on d4 and power up drone at the same time.
For making it easy just unplug the wire first and when you plug it back make sure you have the signal on the right power, in the middle and the ground on the left. When your transmitter turns on select bind and it will start beeping telling you it is in a bind mode.
Then power up your drone holding the d4 button at the same time, plug in your power to flash, hit enter and exit out.
After this it is time to connect the base fly. For this you need to download all necessary drivers enable the base file to communicate with the whole structure. After installing the drivers go to your computer and launch them, which are automatically set auto connect.
Make the pointing direction of your drone matching the one in the configuration file. You should see that after this everything will be tilting in the same way.
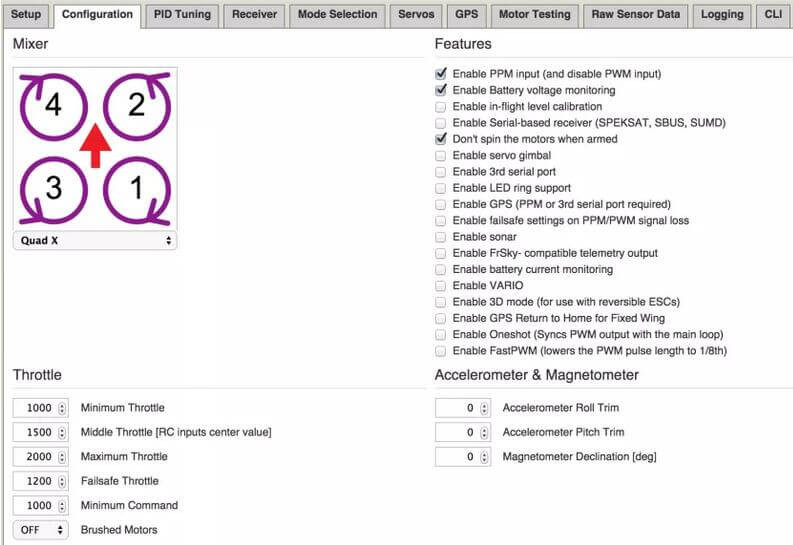 To do that you leave your drone completely flat on the table and you go to configurator enabling some features such as TPM, leave the battery voltage monitoring, do not spin the motors.
By default, the voltage of the battery will be 3.3, but because you should use 3-cell, put the voltage to 10.4 volts.
To do that you leave your drone completely flat on the table and you go to configurator enabling some features such as TPM, leave the battery voltage monitoring, do not spin the motors.
By default, the voltage of the battery will be 3.3, but because you should use 3-cell, put the voltage to 10.4 volts.
Build your own drone what do you need?
#1 Nighthawk 250 package
In the content of this package you will get 4 * 12 am ESC, CC3D flight controller, 6030 fiber props, four 2204 2300 kW motors and the last, but also the most important one is a full carbon fiber frame, with a bag of hardware. Here are all the screws, dampeners for the camera mounting and the carbon fiber body parts. In the package, you can also find all the necessary instructions.
After getting all necessary parts from your package you should screw the arms to the actual body frame.
Constructing or DIY drone you need to start off screws from the top, put arms on which goes over the bottom part of the frame you add all locking screws. You should connect all arms to the body using screws, and bullet connectors to the motor cutting down some of the power wires. Then, shorten all unnecessary power wires and make ready to be mounted on the power distribution board.
After this connect the battery cable to power distribution board so you will have to find positive and negative connection pads. That means negative should be connected to negative and positive should be connected to positive as well.
Mount the motors on the drone. In your EMAX kit, there are clockwise and counterclockwise proper motors which you also should connect to the arms of your frame. In this part, we shall connect all signal wires into the knees, and a receiver.
#2 Transmitter
The first one is a transmitter. It is a good idea to have a transmitter with at least six channels, you can also have one with four channels but in that case, you cannot set up flight modes, discovery buzzer or anything else.
Terranis x9d is a good and a little bit expensive one. However, it is very powerful, so you can do almost everything with it. For example, simply program it to speak to you.
#3 Receiver
Next, Building your own drones you need a receiver for your transmitter. You should use Sky d4 because it supports telemetry and CPM telling you the RSS (radio strength signal indicator). It shows how strong your signal is. With this you can be warned when your signal is low. To connect your transmitter properly all four wires should be connected to the transmitter.
#4 Lipo battery
Another necessary tool is a FPV battery with Trungy nano-tech or Tattu, because they are powerful enough to make your flight possible.#5 Others (Camera, Antenna, etc.)
For FPV part you should use the camera for video transmitter. Immersion RS 5.8 is a great choice, because it normally provides the cleanest signals. To use the transmitter and get the signals you also need an antenna. For a monitor part, you should use Dominator v2, which gives a clear picture. You can also put a memory cart there recording exactly what you see through to the monitor. In EMAX package you can also find CC3D flight controller.Step by Step – Building your own drones
#1 Set up
Set up a new model for your new drone. Go to menu, scroll down enter button and here create models. Also disable a switch warning, select model, hit page down. It is important to name your model.
After this bound your receiver to the remote. For this go down page two on your transmitter, change the mode from d16 to d8. To buy your receiver to your transmitter hold button on d4 and power up drone at the same time.
For making it easy just unplug the wire first and when you plug it back make sure you have the signal on the right power, in the middle and the ground on the left. When your transmitter turns on select bind and it will start beeping telling you it is in a bind mode.
Then power up your drone holding the d4 button at the same time, plug in your power to flash, hit enter and exit out.
After this it is time to connect the base fly. For this you need to download all necessary drivers enable the base file to communicate with the whole structure. After installing the drivers go to your computer and launch them, which are automatically set auto connect.
Make the pointing direction of your drone matching the one in the configuration file. You should see that after this everything will be tilting in the same way.
#2 Building your own drones The next thing you should do is calibrate the accelerometer.
To do that you leave your drone completely flat on the table and you go to configurator enabling some features such as TPM, leave the battery voltage monitoring, do not spin the motors.
By default, the voltage of the battery will be 3.3, but because you should use 3-cell, put the voltage to 10.4 volts.