3 steps learning how to fly a drone for beginners
Feb 8th 2017
After have your own drone, As beginners, the next one is learning how to fly a drone? This article will tell it as simply as possible.
Before this, I found a question is that there are so many related articles on the internet, but some are too cumbersome or some are too shorter then do not know how to do after reading them.
For avoiding this question I had spent times to searching over google and coordinate a lots of related articles to this article, which only 3 steps tell you how to fly a drone for beginners.
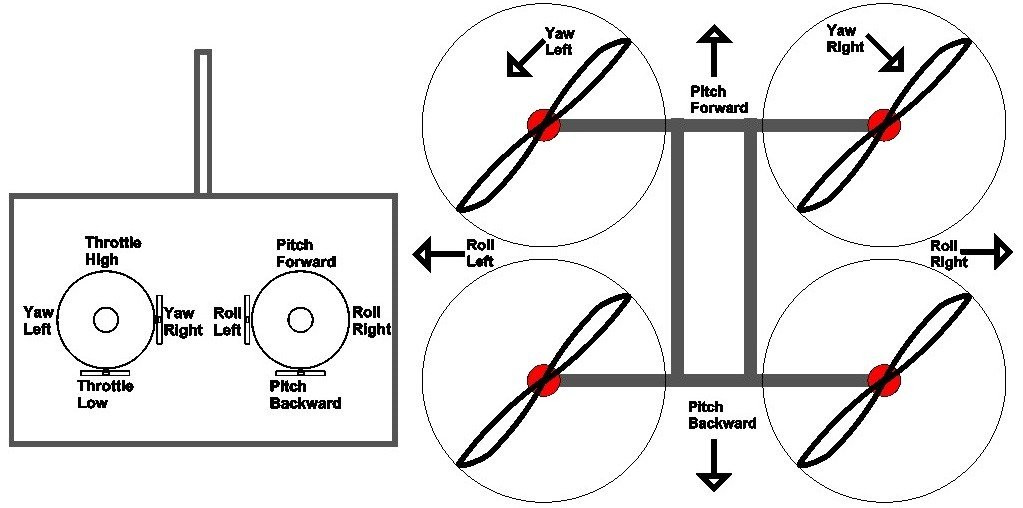
 Right Stick
The right stick controls roll and pitch.
In other words, it moves your quadcopter left/right and backwards/forwards.
Left Stick
The left stick controls yaw and throttle.
In other words, it rotates your quadcopter clockwise or counterclockwise, and it adjusts the height at which you are flying.
Trim Buttons
Right Stick
The right stick controls roll and pitch.
In other words, it moves your quadcopter left/right and backwards/forwards.
Left Stick
The left stick controls yaw and throttle.
In other words, it rotates your quadcopter clockwise or counterclockwise, and it adjusts the height at which you are flying.
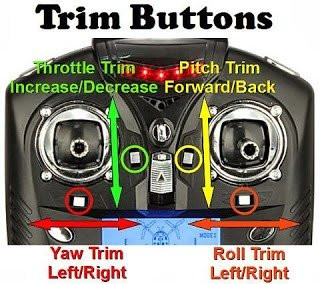
Trim Buttons
Each control has its own trim button, as you can see from the image below.
 Below is an example of all the controls for flying a quadcopter and how each control works.
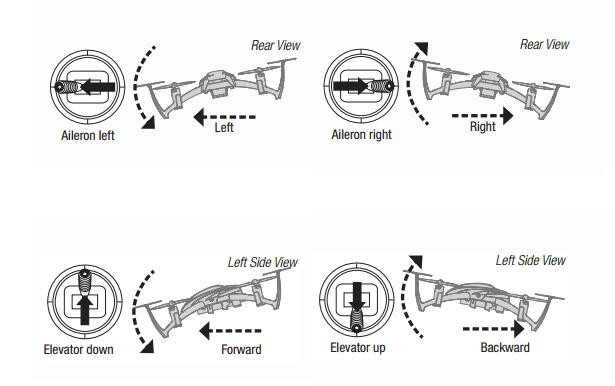
Roll (Aileron) - tilts the quadcopter left and right by speeding up the rotors on one side and slowing them down on the other. Literally rolls the quadcopter, which maneuvers the quadcopter left or right.
Throttle controls the up and down axis by varying the overall speed of the rotors. This adjusts the altitude, or height, of the quadcopter.
Pitch (elevator) - tilts the quadcopter forward and backward the same way that roll does.
Yaw (Rudder) - rotates the quadcopter by speeding up all of the rotors spinning in on direction and slowing down all of the rotors spinning in the opposite direction. Points the front of the copter different directions and helps with changing directions while flying.
Trim - Buttons on the remote control that help you adjust roll, pitch, yaw, and throttle if they are off balance.
Roll moves your quadcopter left or right quadcopter pitching forwards and backwards
Below is an example of all the controls for flying a quadcopter and how each control works.
Roll (Aileron) - tilts the quadcopter left and right by speeding up the rotors on one side and slowing them down on the other. Literally rolls the quadcopter, which maneuvers the quadcopter left or right.
Throttle controls the up and down axis by varying the overall speed of the rotors. This adjusts the altitude, or height, of the quadcopter.
Pitch (elevator) - tilts the quadcopter forward and backward the same way that roll does.
Yaw (Rudder) - rotates the quadcopter by speeding up all of the rotors spinning in on direction and slowing down all of the rotors spinning in the opposite direction. Points the front of the copter different directions and helps with changing directions while flying.
Trim - Buttons on the remote control that help you adjust roll, pitch, yaw, and throttle if they are off balance.
Roll moves your quadcopter left or right quadcopter pitching forwards and backwards
Bank turn - A consistent circular turn in either the clockwise or counterclockwise direction.
Hovering - Staying in the same position while airborne. Done by controlling the throttle.
Figure 8 - Flying in a "figure 8" pattern.
Step 1 - Learning the basics theory of flying a drone
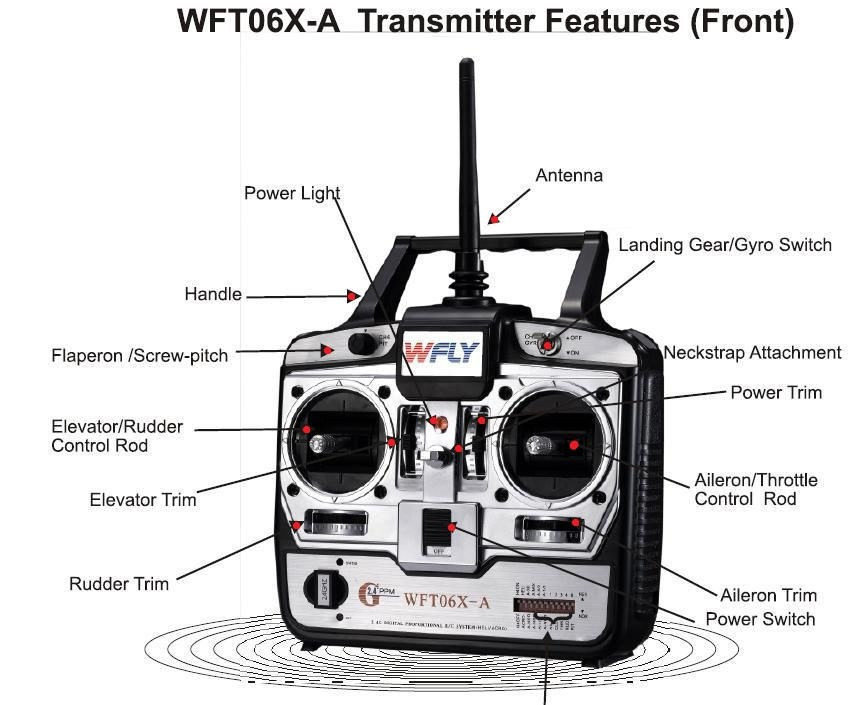
#1 Remote Control/Transmitter knowledges
Right Stick
The right stick controls roll and pitch.
In other words, it moves your quadcopter left/right and backwards/forwards.
Left Stick
The left stick controls yaw and throttle.
In other words, it rotates your quadcopter clockwise or counterclockwise, and it adjusts the height at which you are flying.
Trim Buttons
#2 The quadcopter controls knowledges
Below is an example of all the controls for flying a quadcopter and how each control works.
Roll (Aileron) - tilts the quadcopter left and right by speeding up the rotors on one side and slowing them down on the other. Literally rolls the quadcopter, which maneuvers the quadcopter left or right.
Throttle controls the up and down axis by varying the overall speed of the rotors. This adjusts the altitude, or height, of the quadcopter.
Pitch (elevator) - tilts the quadcopter forward and backward the same way that roll does.
Yaw (Rudder) - rotates the quadcopter by speeding up all of the rotors spinning in on direction and slowing down all of the rotors spinning in the opposite direction. Points the front of the copter different directions and helps with changing directions while flying.
Trim - Buttons on the remote control that help you adjust roll, pitch, yaw, and throttle if they are off balance.
Roll moves your quadcopter left or right quadcopter pitching forwards and backwards
 #3 Maneuvering styles knowledges